How to Build a Modern Cat Condo with
Welcome to DIY for homeowners. We're Mother Daughter Projects. I'm Steph. I'm Vicki and Tyler and this is Axel. We are here at my nephews' and niece's house and brother and sister-in-law's house and they have a cat. This is Axel. Can you tell us, Tyler, where Axel came from. and We found her under a car with like this blue thing on her neck. So we put up signs but nobody said it theirs. So now we have the cat. So they found Axel. So Axel is their great little kitten. Tyler asked us to make a cat condo. So we said sure. Oh yeah we can do that. We actually built this using materials that we already had on hand and that's what we're gonna show you today. How you can build a cat condo with things that you might have already around the house. These are the materials we're gonna get started with. We have two wooden crates,an old cat scratching post, leftover carpet, a 2x4, and an old tabletop. First we cut down the tabletop on our table saw but you could use a circular saw to do this.
Then we laid out the crates and marked where the 2x4 needed to be cut. We made the cut on our miter saw and tested the fit. We wanted to add some extra support to the top of the bottom crate so we added some scrap half-inch plywood that we measured to size and cut down on the table saw. This roll of carpet was left over from an install at Mom's house and we're excited to use it for this project. I measured the spaces we're going to add carpet to and cut it to size. To finish off the edges we're gonna use some rope that we hot glued to the edges. This will keep it from fraying. Then mom sanded all the pieces were gonna use in this project. This is a wine box that mom probably found at a yard sale at some point.
She's sanding the logos off and this will eventually hold toys for the cat. Everything got spray-painted with bright white. Make sure to do many coats rather than heavy coats. The two-by-four got a coat of pre-stain conditioner to help the stain go on nice and evenly on the wood. Then we finished off with Varathane briarsmoke stain which is one of our favorites that we've been using a lot. With everything dry, we started assembly. This is what the back will look like. It will be facing a wall. We glueed that top support plywood to the crate top and then marked and drilled a hole for the cat scratching post.
The base of the cat scratching post this used to be on broke a while back so we thought this would be great to integrate into this project.
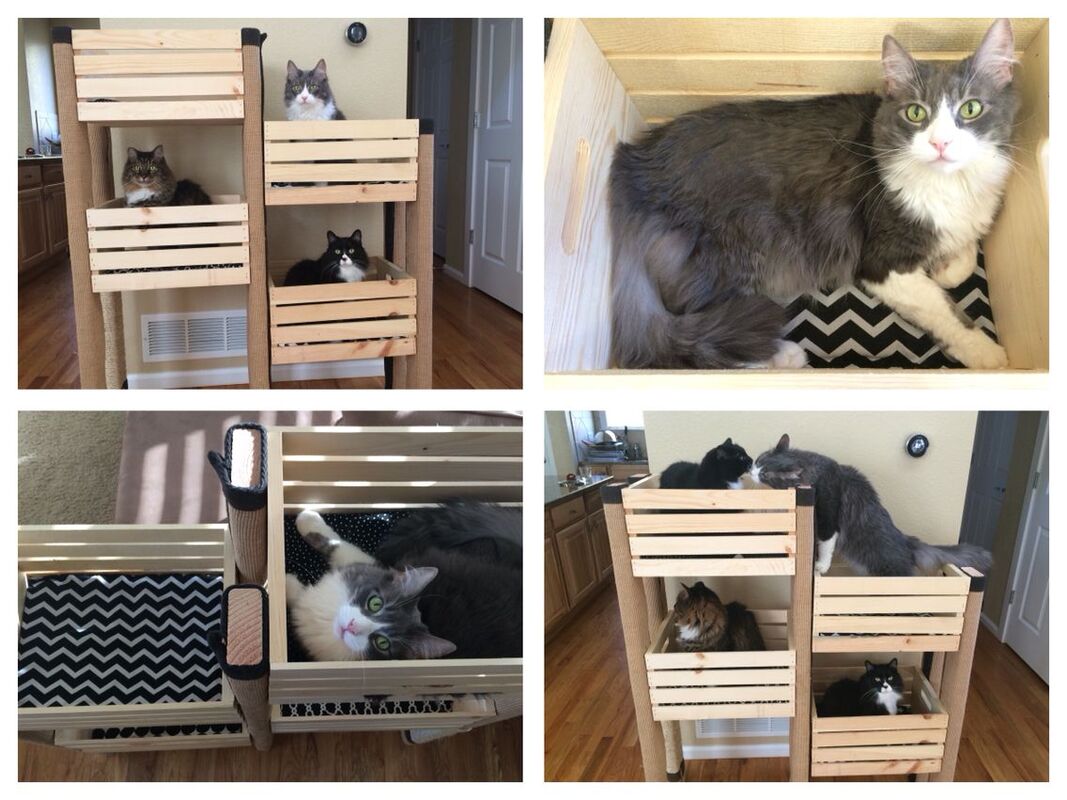
I drilled a hole the size of the bolt for the cat scratching post, inserted it into the bottom and screwed it into place. Then we wood glued and hot glued the 2x4 to the crate and the back piece and wood glued them together. We also secured the parts with screws. The last piece was attaching the post to the base. We lined it up, marked where it needed to be placed and drilled through the top so I could see where the holes were from the bottom. Before we officially attached the post we needed to wrap some rope around a toy perch. Now the only things we actually bought for this project was this rope and the monkey fist knot. Everything else we had in fact on hand. While the glue gun was already heated up I also attached some carpet to the exposed wood between the slats. Then we added glue and put the post in place. You can't see it but I'm underneath adding the two screws for the post support. There I am! All done. We glued the bottom of the crate inside and got those into place. We clamped them while they dried and added two screws for extra support. And on the very top, we're marking where this tray will sit. We marked and drilled two pilot holes to mark where the screws will go. I glued and screwed it into place. We have these metal tiles leftover from a project. They are very simple peel and stick and they were easy to add to the top. It gives a nice finished look and this can double as a small table for beverages for humans that might be sitting next to the cat condo.
Then we laid out the crates and marked where the 2x4 needed to be cut. We made the cut on our miter saw and tested the fit. We wanted to add some extra support to the top of the bottom crate so we added some scrap half-inch plywood that we measured to size and cut down on the table saw. This roll of carpet was left over from an install at Mom's house and we're excited to use it for this project. I measured the spaces we're going to add carpet to and cut it to size. To finish off the edges we're gonna use some rope that we hot glued to the edges. This will keep it from fraying. Then mom sanded all the pieces were gonna use in this project. This is a wine box that mom probably found at a yard sale at some point.
She's sanding the logos off and this will eventually hold toys for the cat. Everything got spray-painted with bright white. Make sure to do many coats rather than heavy coats. The two-by-four got a coat of pre-stain conditioner to help the stain go on nice and evenly on the wood. Then we finished off with Varathane briarsmoke stain which is one of our favorites that we've been using a lot. With everything dry, we started assembly. This is what the back will look like. It will be facing a wall. We glueed that top support plywood to the crate top and then marked and drilled a hole for the cat scratching post.
The base of the cat scratching post this used to be on broke a while back so we thought this would be great to integrate into this project.
I drilled a hole the size of the bolt for the cat scratching post, inserted it into the bottom and screwed it into place. Then we wood glued and hot glued the 2x4 to the crate and the back piece and wood glued them together. We also secured the parts with screws. The last piece was attaching the post to the base. We lined it up, marked where it needed to be placed and drilled through the top so I could see where the holes were from the bottom. Before we officially attached the post we needed to wrap some rope around a toy perch. Now the only things we actually bought for this project was this rope and the monkey fist knot. Everything else we had in fact on hand. While the glue gun was already heated up I also attached some carpet to the exposed wood between the slats. Then we added glue and put the post in place. You can't see it but I'm underneath adding the two screws for the post support. There I am! All done. We glued the bottom of the crate inside and got those into place. We clamped them while they dried and added two screws for extra support. And on the very top, we're marking where this tray will sit. We marked and drilled two pilot holes to mark where the screws will go. I glued and screwed it into place. We have these metal tiles leftover from a project. They are very simple peel and stick and they were easy to add to the top. It gives a nice finished look and this can double as a small table for beverages for humans that might be sitting next to the cat condo.
Now we have our helpers for the last part of the project. Here we're hot gluing rope to the bottom of the post and this was a surprisingly slow process, but Tyler stuck it out and we finished it.
While we were finishing that, Andrew helped Oma add Velcro to the carpet and attach in place. The last part was adding the box which will hold some extra cat toys. What we learned. Like many of you we went to Pinterest to find inspiration and we found a pin that we really liked. That's what we started with but we didn't, it's not exactly like that but we used what we had to create something that looked very similar to that.Yeah, so if we were to do this again the only thing probably that I would change is right here we use a long two by four and on the back, we just use a shorter piece but I probably would make it a little bit longer so it's the same length as this.
The reason why we didn't care about what the back look like was we knew it'd be against a wall. If this could be moved somewhere where it's more on the open so just keep that in mind make sure it looks good from all sides. When you'reusing a hot glue gun please wear gloves cause hot is in the name so it's hot. Okay so when we were using the hot glue we wore gloves and that was a good thing because before was wearing gloves I burned my finger so Tyler weight got me some gloves that was a great idea. We asked you on Facebook if you typically DIY for your pet or if you buy new and there was a lot of different opinions. But one person said that when they make stuff for their pet they always want to make sure that things are replaceable and that's something that we kept in mind for this project. On the carpet we used Velcro so that the carpet can betaken off to be cleaned or replaced. Also this part right here, it actually can come out.
It's pretty tight in there but we could remove it if needed if it broke or if we wanted to replace it with some other kind of fun toy.
